Friday 30 October 2009

Floaty Ghosts - tutorial for munchkins


Happy halloweeeeen! I'm a bit halloweened out, as on Thursday I did halloween crafts with 60 children. Yes, that's right, SIXTY. Not all at once, although it felt like it. We ran a session for under 7's and a session for 7's and over, and did three different craft activities for each. One of the advantages of working in a public library is that you have access to as many craft related books as you can shake a stick at, and so most of the stuff I did was from Usborne Activity books. However, I did have an original idea of my own (gasp!). Here's a quick and easy tute on how to make a Floaty Ghost.

You will need:
An egg box
A pencil/pen for bodging a hole
White tissue paper / crepe paper / kitchen roll torn into strips
Glue (the runny stuff, pritt stick isn't strong enough)
Little round stickers (or a black marker pen)
A big needle
Elastic - I used shirring elastic
Tape

1. Cut a 'bobble' of egg box out


2. Bodge a hole in the top of the bobble with your pencil.

3. Smother your bobble in glue.


4. Stick strips of your white paper to your bobble, making sure you cover it completely. Add more glue on top and stick another layer if necessary.

5. Wait for it to dry a bit (distract your munchkin with a toffee apple or something).


6. Stick on your eyes. I stole these stickers from work found these white stickers and coloured them black with a marker, but you could just use marker if you haven't got stickers.


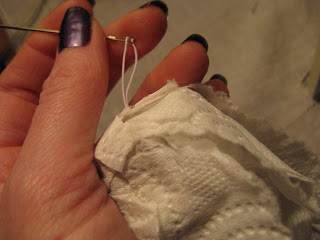
7. Thread your elastic onto your big needle, and poke your needle through the hole you made in the top of the egg box bobble (go from underneath the bobble and out through the top)

8. Secure your elastic to the underside of your bobble with some tape.

9. You've made your floaty ghost!


These are so easy to make, and they were a great hit on thursday with the little munchkins and the big ones. Hope everyone has a spooktacular weekend planned. We're meant to be going to a bonfire party tomorrow night (i have no idea why they're having a bonfire party instead of a halloween one, but hey, there'll be booze and I'm going to wear sparkly things, so I don't care), but Munchkin is scuppering our plans somewhat by being sick. Three times :( I'm hoping she makes a miraculous recovery by tomorrow, as I can't really ask grandma pickledweasel to babysit a poorly child. Fingers crossed...

Sunday 25 October 2009

What I are Lerning - weeks 5 & 6

I've decided to summarise two weeks classes in one post, as it helps with time management (anyone know where I can buy an extra 24 hours a week?!?) and it seems we're alternating between exciting weeks and boring but necessary weeks, so it makes for more interesting reading :)

Last week we still didn't get round to buttonholes. We did buttons though. I never thought there could be so much to learn about sewing on a button :) The best tip was to use a cocktail stick for spacing.


When you sew a button on, you need to leave some slack thread so that the fabric with the buttonhole in will fit nicely when the button is fastened, and the thread won't be stretched.

This week we started to draw up a basic pattern. There was maths, there were set squares, and there were pieces of paper so big I had to work on the floor because they wouldn't fit on the table. It was all a bit scary to begin with, but it started to make sense towards the end of the lesson. Next week is half term, so no college, but I have plenty of homework to be getting on with. I've also started to make another boob tube dress, with the idea that I'll wear it to my works Christmas do.

The fabric is a lovely stretchy cotton with grey, pink and green stripes. Unfortunately it's not quite stretchy enough, and so I've had to make the top bigger to accommodate my boobs, which leaves a bit of bagginess around the waist area. I'm thinking some kind of ribbony lacing at the back might work to help shape it up, but I'm not sure about all the technicalities.... I'll let you know how it turns out :)

Monday 19 October 2009

Custom knitted wristwarmers

Remember this lovely purpley wool?


Well, I thought a bit more about embarking on a double pointed needle journey, and decided it would be a bad move and end up in an unfinished project. And that would be sad because the wool is so nice it deserves to be worn, not languish in a cupboard somewhere.

So I thought I would find someone who could do some knitting for me. And I found Lottie Lodge on Coraindr. She's ace. Look at what she made me!


I'm so pleased with them, they're exactly what I wanted. She was very specific in the information she asked for, and I had to draw round my hand (which was fun :) and provide measurements so they're the perfect fit. And all for the bargain price of £10!


I'm wearing them now, as it's bloomin freezing, and I really can't bring myself to have the central heating on during the day until it's at least November :) If you want something knitted but don't have the skills Lottie's service is perfect. She'll provide you with a quote before you commit to buy, and you can either send her some wool you already have, or she can find yarn for you. Or maybe even buy some from Woolworks or Tomato Tea and have it sent to Lottie!

Thursday 15 October 2009

Tweet-tastic

Hellooo! Just popping in and out again, as things are tres busy in the world of the pickledweasels. We've been away for a few days to see the lovely baby Juliet, and we have weekend plans too as it's my birthday on Saturday.


But I thought I'd just blow my own trumpet a bit. Looooook! My birdy flower brooch has been featured on the Coriandr Blog :) And it's on the Coriandr Front Page (scroll down a bit to the bottom of the page). I'm well chuffed.


And I've just added a new brooch to my shop, a little rainbow cat on a wooden heart. This has been my bestseller at craft fairs (Grandma pickledweasel very kindly takes a board of my jewellery along with her when she has a stall anywhere), so I'm hoping they'll prove as popular online :)

Saturday 10 October 2009

Covered pin board tutorial

Ta daaaaaa! Here is my very first tutorial, and it's not about clothes for Munchkin, which surprised even me :)

I had the idea for these pin boards when I was looking at the ridiculously ineffective one I bought for £2 from Tesco. It's not attractive or functional in the slightest, and I thought how cool it would be if I could do a little personalised pin board for everyone in the pickledweasel family. Grandma pickledweasel had some cork pot stands from Ikea that she didn't need any more - she'd bought them thinking she could display jewellery on them at craft fairs, but they just didn't work. So I nabbed them and had a play around. This would be a great housewarming present :)


Here's what you'll need:
  • A sturdy cork board of some description, preferably round. I don't know how much the Ikea ones were, but I'd imagine they were cheap.

  • Fabric to cover your board with. You'll need a 2" border, so make sure the piece you choose is big enough.

  • Embroidery thread that co-ordinates with your chosen fabric.

  • Sewing thread.

  • Felt to back your board with. Doesn't have to be matching as no-one's going to see it, but if it's a present for someone you might want to make it co-ordinating.

  • Tailors chalk if your felt is a dark colour, pencil if it's a light colour.

  • Co-ordinating ribbon or ric rac to hang your board up with. I used 11 inches.

  • Fabric scissors.

  • Glue.

  • Marker pen, string and a drawing pin.

Optional: A sewing machine, an iron-on transfer letter.

First you need to draw out a circle on the fabric you're using to cover your board. I used string pinned to the middle of the board with a marker pen tied to the end, and I made the string 2" longer than the radius of the board. When you've marked your circle, cut it out with the fabric scissors.


Now you need to cut your felt circle. For this I just drew around my board with tailors chalk, and then cut out a circle slightly smaller than the one marked. You need a circle that's about 2cm smaller in diameter than your board.


Now sew on your ribbon or ric rac to your felt circle. It needs to be pretty secure, as it'll be holding your board up. I sewed mine using a machine, but a couple of rows of sturdy hand sewing would be fine.


Next you need to work out where to put your letter. Lay your fabric over the cork board so that the border is even all the way round. If you're arty and have the skillz you can draw your letter straight on to the fabric, but I'm a bit pants at that sort of thing, so I used a transfer letter from this book. Either way, you need to make sure your letter is central at the top of the board. If you're using a transfer, iron it on.


Now embroider it! I'm normally lazy and don't use an embroidery hoop, but I did this time as I didn't want the fabric to pull or runckle when I covered the board.


When you've embroidered, iron the fabric so it's nice an crease-free. Place your fabric face down and put the cork board on top, making sure your letter is in the right place.

Now turn it over.

Apply a border of glue to the back of your board - cork is quite absorbent and you might find your glue disappears quickly, so you'll need to re-apply if necessary.


Starting with the top of the board where your letter is, fold your fabric over the back of the board, pulling it tight as you go. You'll need to put more glue onto the fabric you've already folded to help stick down new folds. Don't worry if it gets all messy, it's going to be covered with felt. Just make sure your fabric is nice and tight.


Finally, you need to glue your felt circle to the back. Makes sure you put lots of glue on, and maybe squish it with a big thick book for a bit as it dries.

And then it's done! I've made one for Munchkin (J) and one for mr pickledweasel (D), but haven't got round to mine yet. I love the idea of a whole co-ordinated family of personalised pin boards :)


Leave a comment if you make one with a link to your blog / photos :)

Wednesday 7 October 2009

What I are Lerning - weeks 3 & 4

I've combined this week and last week for a couple of reasons - because I was ill I missed my class on Monday and went along on Wednesday instead, so I haven't really had time to do a post about it, and it was a bit of a boring (but necessarily so) class.

My excitement about buttonholes and pockets was short lived, as our tutor has slowed things down a bit and we did seams. Yawn. We have been promised buttonholes next week. I think because there's 15 of us it's taking a lot longer to cover topics, and some people are complete beginners, so the pace has been adjusted accordingly.

I did learn things about seams though. The first thing was if you don't have an overlocker and you want to neaten seams but you're a bit lazy and don't want to zigzag everything, use pinking shears. The second thing was I need to buy some pinking shears. The third thing was I really want an overlocker.


This week was far more exciting. We made a dress! From jersey!! Which up til now has been my most feared fabric. Yet I have conquered it :) It's a very simple dress - rectangular boob tube up top, rectangle skirt below. Mine is all shiny because my theme is around Ndidi Ekubia's work, and she works in metal. You can wear it loads of different ways - I've decided to fold the boob tube bit double, so the skirt is shorter and more tunicy. Here's the dress with the boob tube at its full length:

I don't think it looks as nice this way, it's a bit too eighties, although that may just be the fabric (£1 a metre from the old magic fabric shop). Plus it makes me look short :) Here it is with the top doubled over. See, much taller!


I managed to get the whole thing sewn in class, although when I got home I looked at it closely and really wasn't happy with the gathers along the skirt, so I unpicked it all and redid it. We'd loosely pinned the skirt on to the top at 8 different points, and our tutor suggested we make the gathers up as we go along, pulling the top tight and runckling the skirt fabric as we sewed. My runckles weren't small enough and so looked very patchy. Instead I pinned little rough pleats and then sewed so it's a bit more uniform.


It's not quite finished, as I want to make a belt to go under the bust line with some of the leftover fabric. Grandma pickledweasel's given me some interfacing, so I think I'll do a broad shaped band with some sort of stitching on the front, but I need to give it a bit more thought. This dress is our first assignment, so we have to reflect and evaluate the whole process, as well as provide sketches. Eeeek. Drawing. Help! Our homework for next week is to do four still life sketches. I won't embarrass either you or myself by sharing my feeble efforts.

I'm not planning on wearing this sparkly affair by the way, it's just for my assignment. And apologies for the 'I don't know what to do with my hands' modelling poses :)

Tuesday 6 October 2009

Cord tunic


This is the second tunic I've made, and it's a slightly heavier weight so that Munchkin can wear it now. The original one was in summery fabric, and size 2T - this one's 18 months and a perfect fit. One side is in a really soft cord from Abakhan, and the other side is some embroidered cotton twill that was a remnant in the new magic fabric shop. I love the colour combination - I think baby Juliet will get a diddy version as a Christmas present.


Apologies for the out of focus photos / messy house / unkempt child model. I need a new house so I can a) have a studio to work in, rather than have to do my craft stuff on the dining room table, and then worry about munchkin eating pins I've dropped on the floor, and b) have a small photographic studio with a variety of backdrops including an immaculate child's bedroom, a sophisticated bar (for when I want to take photos of me in stuff I've made, seeing as how I never actually go out), and an 'outdoors' backdrop, because it's always raining in the real outdoors.

Monday 5 October 2009

Christmas Making - Neckwarmer no. 2


This one's for my mum, and is in a lovely soft maroon wool. She recently had a big wardrobe clearout, and the button is salvaged from a cardigan she got rid of. Bit cheeky, giving her back her own button, but it went so well I couldn't resist :)


When I was at the shop choosing the maroon wool I saw this lovely purpley-blue and couldn't resist as it was in the bargain basket. But what to knit with it? I really want some wrist warmers, but looking at all the patterns it seems I'll need to use double pointed needles, and I think they're a bit beyond my skills at the minute.


Even though in this video, the lady demonstrating at the end says, 'It's that simple!' It really doesn't look it. It looks like it could end in tears and possibly some eye gouging with the spare needle. I'll just have to put wrist warmers on my Christmas list :)

Thursday 1 October 2009

These are a few of my favourite things.


Kittens, and string, and small children in cooking pots, and ...other stuff. Or whatever Julie Andrews goes on about. I've actually never seen Sound of Music. Am I missing out?

Anyhoo, this week has morphed into some sort of Seven Days of Hell test the pickled weasels to the limits and then pooh on them from a great height scenario. As a consequence I have been quite busy. No time for crafting - just going to work, trying to cook 3 days worth of meals in one go at 10pm, arranging childcare, re-arranging childcare, re-arranging childcare, and trying to rid the house of the smell of vomit.

So, no time for craft means no interesting things to blog about. So you'll have to make do with this hastily cobbled together filler post lovely collection of interesting things.

1. Emmy the Great - listen and love. I can't stop playing her album :)


2. Get a £5 gift voucher from Ikea in exchange for donating 5 books to Unicef - details here (scroll down the page a bit)


3. Possibly the coolest competition ever. I reeeeally want to enter but I don't think I have enough time to put together a decent entry what with college / work / clearing up vomit.


4. Fantastic Very Hungry Caterpillar fabric. Is it me, or is this crazily cheap? They do a Brown Bear Brown Bear range as well. I'm seriously tempted...


5. Parasol Craft - fab new online magazine, that's the bargain price of $2.50 (about £1.58), and is full of lovely things. I'm hooked :)


I'll see you on the other side of the weekend xx